Does your clutch pedal make your leg tired while sitting in traffic? Have you had trouble with your clutch cable melting, stretching or snapping? Well, Mcleod Racing has a solution with their hydraulic clutch conversion with their wide range of clutches and accessories. Mcleod has been on the leading edge of clutch technology since 1971, so it is safe to say they know what they are doing.
The car we will be installing the hydraulic conversion and RST clutch on is a 1993 Mustang, that is also in dire need of a new clutch. This Mustang made around 300 hp to the rear tires before the installation of a Vortech S-trim supercharger that pumps out 12 pounds of boost. During a recent dyno tuning session at Murillo Motorsports, the old clutch gave up the ghost once Mike tried to add some timing to the tune. So the tuning session was over with 420 hp, 475 lb/ft and a smoked clutch. The Fox body Mustang should have put out close to 500 hp at the end of the tuning session, but we were unable to get there with the clutch failure.
The Factory Cable Issues

This cable has been replaced once already and you can see it is about to come apart again
The Fox body Mustangs are known for having issues with the clutch cable. Paul Lee from McLeod says, “We designed the kit to help solve the cable stretching and snapping issues with the Fox body Mustangs, but also to reduce the amount of effort needed to push in the clutch pedal.”
The most detrimental issue is heat from the headers melting the inside of the cable over time. This will cause the pedal to feel stiff or even stop moving all together. Most of the aftermarket cables are not wound as tight as the stock Ford cable and therefore they fail and fray sooner then expected. This car had a cable melted and it was replaced with an aftermarket adjustable cable. As you can see in the photos it is already starting to come apart.
Selecting the Right Clutch
Where do you begin on clutch selection with so many options? When you get to the 500 hp and 500 lb/ft at the wheels mark, it starts to get tricky on picking a clutch that holds the power and is still easy to drive. You can step up to the puck- style clutches and they get harder to drive on the street. Additionally, you can have issues with clutch chatter and very stiff clutch feel, which will make you not want to drive the car around in traffic. This is where the twin disc clutches come in; they can handle tons of power by doubling the surface area of the clutch disc and still give you a decent pedal feel. The twin disc also eliminates the causes of chatter in daily driving situations.

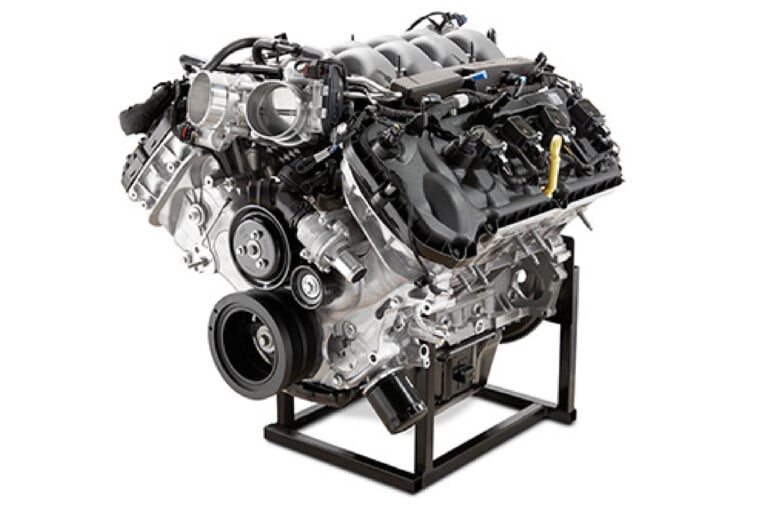
Here is the RST clutch as assembled from the factory. According to Lee, "McLeod started developing and manufacturing twin disc clutches in the 1970’s."
We picked the Mcleod RST Twin Disc clutch to put in the Mustang for several reasons. One is budget, it is cheaper then the top of the line twin disc clutch that McLeod offers, but will still hold up to 800 hp without batting an eye. Additionally, we can still use the stock flywheel. The clutch also retains very good street manners with the two organic lined clutches. Taking advantage of the twin disc setup also keeps a nice soft pedal feel. How can you beat a reasonably priced clutch that will even give us room to grow in the horsepower department and works great on the street?
 McLeod Racing RST Twin Disc PN 6911-03
• Economically priced twin disc clutch
• Reuses stock flywheel
• 800 hp capacity
• Organic lined clutch disc provide smooth engagement
• Includes pressure plate, two organic friction discs, floater plate, adapter ring and pilot tool.
McLeod Racing Hydraulic Conversion Kit PN 14-325QD
• Converts cable clutch linkage to hydraulic linkage
• Smoother clutch operation, cleaner clutch disengagement
• Complete bolt-in kit
• No modifications necessary
• Quick disconnect fitting eliminates fluid loss
• Master cylinder and internal hydraulic bearing included
• Fits 1979-2004 manual V8 Mustangs
The Installation
We started by getting the Mustang up in the air and removing the transmission. There are a host of bolts that secure the bell housing to the block, transmission mount, and driveshaft. Now that the pressure plate is visible, insert the clutch alignment tool and remove the bolts that retain the clutch to the flywheel. Using the alignment tool will keep the pressure plate and disc from falling when all the bolts have been removed.

What we find is a clutch that took a lot of abuse over many years and could not handle the new found supercharged power. The flywheel suffered as well, showing a lot of hot spots that will need to be taken care of. It is always recommended to resurface the flywheel when installing a new clutch just like turning rotors when you install brake pads. It insures a nice clean and flat surface for the new clutch disc to grab on to.
When reinstalling the flywheel, make sure to get the block plate back on first and torque the bolts to factory specs. The torque spec for a 1993 Mustang 302 is 85 foot pounds and requires the use of thread locker. The McLeod RST Twin Disc clutch comes assembled in the box because they have assembled it on the bench in the shop to check clearances, which they do on all clutches before they ship. You will have to separate the pressure plate from the adapter ring and that disc is the top disc.

We had the flywheel sent out for resurfacing, which only cost us about $50. “For proper operation and product life the flywheel should be replaced or resurfaced,” said Lee. "An old clutch can create uneven wear patterns on a flywheel and installing a new clutch without fixing that can cause inadequate clutch wear."

With the flywheel and block plate in place insert the alignment tool through the bottom clutch disc and into the new pilot bearing. The disc is labeled to show which surface goes towards the flywheel. Next bolt the adapter ring with floaters attached to the flywheel using the factory bolts torqued to 35 foot pounds and if you need to remove the floater for any reason retorque those bolts to 25 foot pounds.
After the adapter plate is torqued down verify the bottom disc is free to turn without any drag. There should be around a 0.020” gap betweing the disc and the flywheel. Now place top clutch disc over the alignment tool and make sure both the top and bottom discs turn together. The pressure plate is bolted up next. Make sure that each stud gets a flat washer, lock washer and a nut and the nut will be torqued to 25 foot pounds. Before tightening the pressure plate make sure the clutch discs still turn freely and that the alignment tool is straight before getting the pressure plate tight.

You can see here the white paint line to verify you have the adapter ring and the pressure plate lined up properly. The adapter ring will only line up in one location on the flywheel, so getting the white marks lined up is very important.

After talking with Lee about the headers on this car, he decided we needed the 14-325 kit for clearance issues. The only difference in the two kits is the slave cylinder with a hydraulic throw out bearing. Lee also mentioned, “The 14-326 part number can be installed without removing the transmission or bell housing.”
Before installing the bell housing you have to decide which hydraulic conversion kit you want to install. The McLeod Racing 14-326 is the kit for a stock type vehicle with an external slave cylinder and the 14-325 kit has the hydraulic throw out bearing. The 14-326 will not work with long tube headers. The “QD” on the end of the part number adds the quick disconnect hose option to either kit which makes the install much easier. If you are using the 14-325 kit with the hydraulic throw out bearing, you can pull the clutch fork.

You will be removing the clutch pivot arm and throw out bearing from the bell housing. The pivot ball stud can also be removed.

The 14-326 is designed to allow installation without removing the bell housing since it uses the stock clutch fork and throw out bearing. Moving on with the install, you can remove the stock or aftermarket quadrant from the pedal assembly and replace it with the aluminum version in the kit. The next step is to mount the fire wall adjuster onto the fire wall with at least 2 screws attaching it. Line up the flat side of the adjuster against the seam on the fire wall.

The new slim style clutch master mounts directly to the new firewall mount adaptor. Screw the adjuster in so you can get the master cylinder cable hooked on to the quadrant under the dash. Then adjust the firewall adjuster out until there is a little tension on the master cylinder.

The reservoir is mounted on the shock tower in front of and just above the brake master cylinder. You can also see the feed line is run close to the shock tower and out of the way.
Next is mounting the reservoir to the shock tower on the driver’s side. There is a small cut out at the back for added clearance for the brake master cylinder. There are two mounting screws that will need holes drilled in the shock tower to be mounted. Once the reservoir is mounted the red rubber feed hose can be installed. The braided line can be attached and it will hang down along the firewall until the throw out bearing is installed.
With the transmission out and the bearing retainer clean and smooth slide the spacer sleeve all the way to the rear against the transmission with the beveled side towards the transmission. For this installation we used a new steel bearing retainer from Latemodel Restoration Supply along with new fasteners.

Unscrew the adjustment bolt out of the throw out bearing and slide it up against the spacer sleeve with the bevel direction towards the rear. A little lube on the o-rings makes this step a little easier. Screw the throw out bearing all the way on the adjuster, making sure to end up with the hydraulic bleeder line on top and the feed line out on the bottom.
Now you need to measure from the face of the throw out bearing to the face of the transmission that fits against the bell housing. With the bell housing tight to the engine block, measure the distance from the clutch fingers to the outside of the bell housing. You will subtract the first dimension from the second dimension. This is to set the gap between the throw out bearing and the clutch. You want this distance to be between 0.100” to 0.300”. You can adjust this by screwing in or unscrewing the throw out bearing, adding washers to space the transmission back or adding and removing spacers. It appears as the standard spacer that comes with the kit is for a single disc clutch. Since we are using the twin disc clutch we had 0.250” machined off our spacer to get the gap set pretty close to 0.200”.

The throw out bearing is threaded onto the adjustment screw. Start with the bearing screwed all the way down then check your measurements and adjust as needed. You can also shim the transmission out from the bell housing as needed. Billy, the tech at McLeod says, “You could use zero spacers or up to 3 or 4 spacers, it just depends on your application.” This is where you would tie something onto the braided lines to help feed them through the bell housing access hole.
Tie some string around the braided lines coming off the throw out bearing and feed it through the hole in the bell housing where the clutch fork use to reside. This will help you feed the lines through as you install the transmission. Now you can start sliding the transmission back into the bell housing and pulling the lines out the side access hole. Once the transmission is in, connect the lines and bleed the system. I had the best luck with bench bleeding the master cylinder. If there is any slack in the clutch pedal, adjust the firewall adjuster out to get the engagement where you prefer.

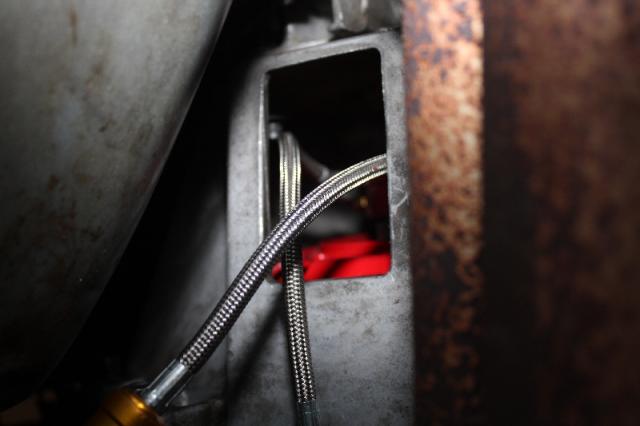
The braided lines run through the access hole for the clutch pivot arm. McLeod recommends you add a split rubber hose zip tied to the braided lines to prevent any chaffing. Finally, connect both sides of the quick disconnect fittings.
We have not made it to the track with the clutch and conversion kit yet but it is a dream in traffic. With a cable clutch you have to mechanically pull the throughout bearing through a cable connected to the clutch pedal. Having a hydraulically-aided system takes literally 1/2 the effort to engage/disengage. Also with a properly bled system, you will never have to adjust the system like you would on a cable configuration.
Having the hydraulic conversion paired with the twin disc clutch, the feel is closer to something you would find in a stock Honda. The RST clutch by itself will have a feel closer to a stock Mustang clutch, due to its twin disc technology. Twin discs allows McLoed to distribute the power over two clutch discs and requires less harsh clutch materials that are commonly associated with a grippy clutch. You combine the two and the pedal may be too soft for some (if you use your clutch pedal as a way to work out), but if you drive in a lot of traffic I think you would love it. We hope to get the track soon and see how it performs there.
Check out the video install of the hydraulic conversion kit!